🌿 Handmade Backyard Hideaway: A Smart & Stylish DIY Retreat
If you’ve ever dreamed of having your own peaceful nook in the backyard — a cozy spot surrounded by nature where you can relax, read, or just escape for a while — this handmade hideaway is the perfect weekend project.
The best part? You can make it with simple materials and a little creativity — no professional builder required!
🧰 What You’ll Need
Basic materials:
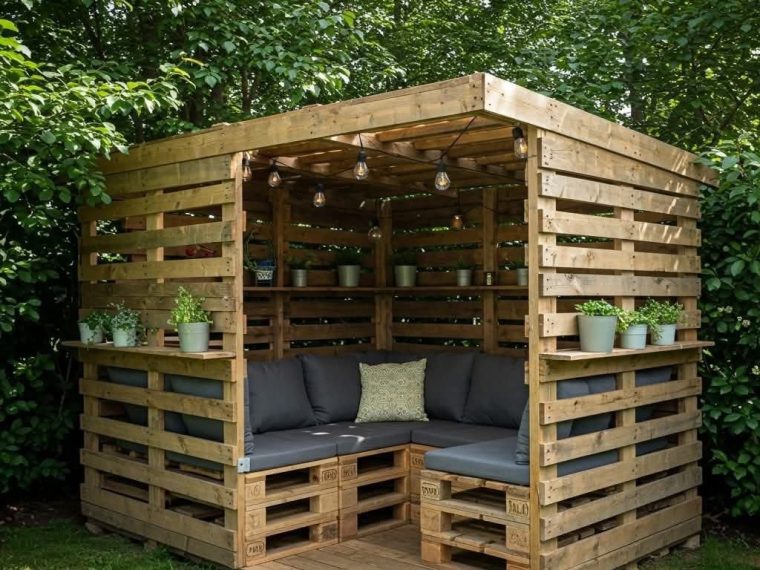
- Wooden pallets or reclaimed wood planks
- 4–6 wooden posts (for the structure)
- Screws or nails
- Hammer or drill
- Measuring tape
- Waterproof tarp or corrugated plastic sheets (for the roof)
- Fabric curtains or outdoor blinds (for shade/privacy)
- Cushions, blankets, and fairy lights (for decor)
Optional add-ons:
- Small side table or crate for drinks/books
- Potted plants and hanging vines
- Outdoor rug
🪚 Step-by-Step Guide
Step 1: Choose the Perfect Spot
Pick a quiet corner of your backyard — preferably one that gets some shade during the day.
Flat ground is best, but you can level uneven soil with a shovel or sand.
Step 2: Build the Base
- Use wooden pallets or planks to create a simple platform.
- Make sure it’s stable and level.
- Screw the pieces together tightly to avoid wobbling.
- If you want to elevate it slightly, use cinder blocks or wooden supports underneath.
💡 Tip: Sand down the wood to prevent splinters, and seal it with outdoor wood protector.
Step 3: Set Up the Frame
- Attach 4–6 wooden posts to the corners of your base (depending on your design).
- You can make a teepee-style frame (angled poles meeting at the top) or a square frame like a small gazebo.
- Use screws or rope to secure the joints tightly.
Step 4: Add the Roof
- Cover the top with a tarp, bamboo mat, or corrugated plastic sheet.
- This provides shade and protection from rain.
- For a natural look, you can use woven branches or palm leaves as a rustic-style roof.
Step 5: Create Cozy Walls
- Hang light fabric, old sheets, or outdoor curtains around the frame for privacy and shade.
- You can also attach bamboo screens or lattice panels for a stylish touch.
Step 6: Decorate Inside
Now comes the fun part — turning it into your dream hideaway!
🪞 Add:
- Soft cushions, blankets, or bean bags
- A small rug for comfort
- Fairy lights or solar lamps for warm evening glow
- Plants or hanging vines for a natural, magical feel
🪴 Optional Upgrades
If you want to take it a step further, try these creative ideas:
- 🌸 Garden theme: Add flower pots and climbing plants around the structure.
- 📚 Reading nook: Include a bookshelf or small crate with books and candles.
- ☕ Mini café vibe: Place a small table, chair, and string lights for coffee mornings or sunset teas.
- 🎨 Kids’ fort: Paint the walls with bright colors and fill it with toys and floor pillows.
💧 Maintenance Tips
- Reapply wood sealant or varnish once a year to protect from rain and sun.
- Keep the roof clean from leaves or debris.
- Use washable fabrics for curtains and cushions.
🌞 Why You’ll Love It
- Eco-friendly: Made mostly from recycled or reclaimed materials.
- Low cost: Can be built for under $100 with creativity.
- Customizable: Build it big or small, rustic or modern.
- Relaxing: A perfect escape for reading, meditation, or family time.
✨ Final Thoughts
A handmade backyard hideaway isn’t just a structure — it’s a personal sanctuary.
Whether it’s your morning coffee spot, your kids’ adventure fort, or a romantic nook under the stars, this DIY project transforms your backyard into something truly special.
“You don’t need to travel to find peace — sometimes, you just need a cozy corner you built yourself.” 🌿💚