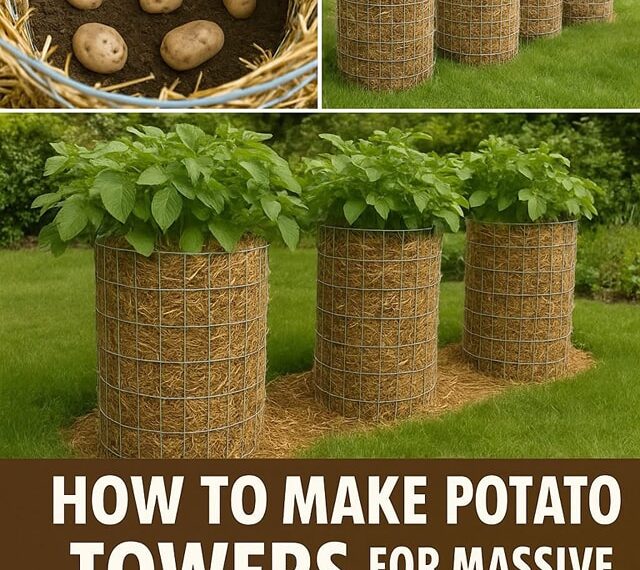
Want to grow more potatoes without spending extra on seed tubers? You’re in the right place. By learning a simple method—cutting seed potatoes before you plant—you can get a much bigger harvest from fewer potatoes.
This guide will walk you through the hows and whys of slicing seed potatoes, how to plant them correctly, and what to do to keep your plants healthy all season long.
Why Bother Cutting Seed Potatoes?
Before you drop whole potatoes into the ground, here’s why you should consider cutting them first.
1. Get More Plants from Fewer Tubers
Every section of potato that has at least one “eye” (the little sprout growing point) has the potential to become a full plant. By cutting each tuber into smaller pieces, you multiply your planting stock.
2. Save on Garden Space
Smaller pieces give you more flexibility in how you space your garden. You can fit more plants without cramming them too close together.
3. Reduce Risk of Rot
Letting the cut surfaces dry out—or “cure”—before planting helps them form a protective barrier. This reduces the chance of your potatoes rotting in the soil.
4. Stretch Your Budget
Instead of buying extra seed potatoes, you can stretch a single bag much further by cutting the tubers up. More savings, more spuds.
How to Cut Potatoes the Right Way
You’ll want to start with firm, healthy seed potatoes. Don’t use store-bought eating potatoes unless they’re certified disease-free—seed potatoes are grown specifically for planting.
Step-by-Step Cutting Guide:
- Pick Your Potatoes: Choose firm, clean tubers with at least a few visible “eyes.”
- Slice Them Up: Use a clean, sharp knife to cut each one into golf ball–sized chunks (about 2–3 ounces per piece).
- One or Two Eyes Per Piece: Each section should have at least one healthy eye. Two is even better.
- Let Them Cure: Place the pieces in a dry, well-ventilated space out of direct sunlight. Let them sit for 24 to 48 hours. The cut surface will dry out and form a callous.
- Don’t Cut Too Early: Make sure you cut them just a day or two before planting. Cutting too far ahead can cause them to shrivel or rot.
Planting Your Potatoes for Success
Once your cut pieces have cured, it’s time to get them in the ground. Here’s how to give them the best start possible.
Choose the Right Spot
- Full Sun: Potatoes love light. Pick a spot that gets at least 6 hours of direct sunlight daily.
- Well-Drained Soil: Avoid soggy or compacted soil. Add compost or sand to improve drainage.
- Raised Rows Work Well: Mounding soil in rows about 8–10 inches high helps keep tubers from sitting in wet soil and allows space for growth.
How to Plant:
- Spacing: Place each piece 12 inches apart.
- Depth: Bury them 4–6 inches deep with the eyes facing up.
- Cover Lightly: Don’t pack the soil too tightly over them—just enough to hide and protect them.
Taking Care of Your Potato Plants
Once your potatoes are in the ground, your job isn’t over. A little ongoing care will go a long way in boosting your harvest.
Watering Tips:
- Consistent Moisture: Keep the soil evenly moist—not soaked. Too much water can lead to rot, while too little can stunt tuber development.
- Deep Watering: Give them a good soaking once a week, especially if the weather is dry.
Hilling for Better Growth:
- As your plants grow 6–8 inches tall, start mounding soil up around the base of the stems. This is called “hilling.”
- Continue to hill every few weeks to keep tubers from being exposed to sunlight. (Exposed potatoes turn green and become toxic.)
Feeding the Plants:
- Compost is Gold: Add compost at planting time and again mid-season.
- Fertilize Smart: Choose a balanced fertilizer, especially one that’s higher in potassium. Avoid too much nitrogen—it’ll give you great leaves but fewer potatoes.
Bonus Tips for a Healthy Harvest
- Watch for Pests: Colorado potato beetles and aphids are common potato enemies. Inspect leaves regularly and remove pests by hand or with organic sprays.
- Rotate Crops: Don’t plant potatoes in the same spot year after year. Crop rotation helps prevent disease and improves soil health.
- Harvest at the Right Time: Wait until the foliage dies back before digging up your potatoes. This gives the tubers time to mature fully.
Common Mistakes to Avoid
Here are a few things to steer clear of if you want your potato crop to thrive:
- Skipping the curing step: Planting freshly cut potatoes makes them vulnerable to rot.
- Planting upside down: Always place pieces with the eye(s) facing up.
- Overwatering: Wet feet lead to rot—err on the side of moist, not muddy.
- Planting too shallow: Tubers exposed to light become bitter and green.
Final Thoughts: More Spuds, Less Stress
Cutting and planting potatoes the right way doesn’t take much effort, but it makes a big difference. You’ll get more plants, healthier growth, and a bigger harvest—all while saving space and money.
Whether you’re new to gardening or just looking to boost your yield this season, this method is a smart move.
Ready to Grow Your Best Potato Crop Yet?
Now it’s your turn! Put this guide to use and enjoy the rewards of your own potato patch.
✅ Check your seed potatoes and prep them for cutting
✅ Follow the planting tips for healthy, productive growth
✅ Share this guide with a fellow gardener who’d love it
Start today, and you’ll be digging up delicious homegrown potatoes before you know it! 🌱🥔