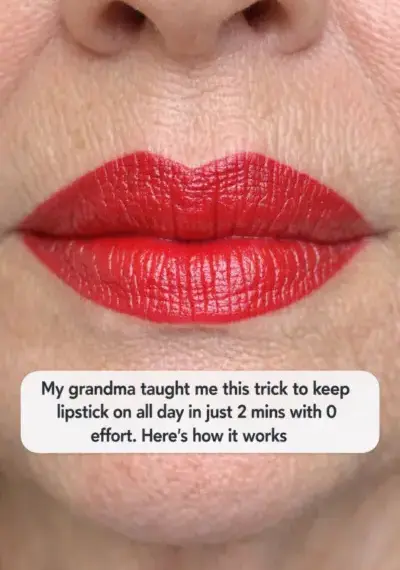
Lipstick is one of those magical beauty products that can instantly elevate your look and mood. However, the challenge of keeping it intact throughout the day is something many of us struggle with. Whether it’s sipping on coffee, having lunch, or just the natural fade that happens over time, lipstick seems to need constant reapplication. But what if I told you there’s a trick that takes only two minutes and requires zero effort to keep your lipstick on all day? This trick was passed down to me by my grandmother, who always had flawless lipstick, regardless of how long her day was.
My grandma was a firm believer in simplicity and efficiency. Her beauty routine was minimalistic, yet effective, and her lipstick trick is a testament to that. I remember watching her get ready and marveling at how effortlessly she applied her lipstick, only to find it perfectly in place hours later. Today, I’m sharing this time-tested beauty hack with you, so you too can enjoy long-lasting, vibrant lips without the constant touch-ups.
1. The Two-Minute Lipstick Trick My Grandma Swore By
The beauty of this trick lies in its simplicity. My grandma’s method involves just a few key steps, none of which require any fancy products or elaborate techniques. It’s about preparing your lips properly, applying the lipstick in a specific way, and locking it in with a final touch. This entire routine takes only two minutes, making it perfect for busy mornings or when you’re on the go.
First, you start by prepping your lips. This step ensures that your lips are smooth and ready to hold the color. Next, my grandma used an unexpected base layer that helps the lipstick adhere better. She then applied the lipstick with precision, followed by a simple yet effective move involving a tissue and powder. Finally, a light swipe of lipstick at the end gives a fresh, non-dry finish. Each step is quick, easy, and makes a significant difference in how long your lipstick stays put.
2. Why Lipstick Fades So Fast (And What You’re Doing Wrong)
Lipstick fades for a variety of reasons, and often it’s due to common mistakes in application and preparation. One of the primary reasons is that we tend to apply lipstick on dry, unprepared lips, which causes the color to settle into cracks and wear off quickly. Another mistake is using too much product, which can result in smudging and uneven wear.
Additionally, many people skip the important step of setting their lipstick. Without a proper setting technique, even the best formulas can fade after a few hours. Understanding these pitfalls is essential in preventing them and ensuring that your lipstick lasts longer.
3. Step 1: Prep Your Lips in Seconds Without Any Fancy Products
The first step in my grandma’s lipstick trick is to prep your lips, and it’s all about hydration and smoothness. Simply use a damp washcloth to gently exfoliate your lips for a few seconds. This removes any dry skin and creates a smooth canvas for the lipstick.
Next, apply a thin layer of lip balm and let it absorb for a minute. This ensures your lips are moisturized but not greasy, which can affect the adherence of the lipstick. By doing this, you’ll have a perfectly smooth base that helps the color glide on easily and stay vibrant longer.
4. Step 2: The Surprising Base Layer That Makes Color Grip All Day
After prepping your lips, my grandma’s trick involves applying a very light layer of foundation or concealer over your lips. This step might seem unusual, but it creates a neutral, even base that enhances the lipstick’s color and longevity.
Use your fingertip or a small brush to dab a tiny amount of foundation, blending it lightly over your lips. This not only neutralizes your lip color, allowing the lipstick shade to stand out, but it also gives the lipstick something to adhere to, preventing it from fading too quickly.
5. Step 3: Apply Lipstick Once—But In This Specific Way
When it comes to applying lipstick, technique matters. My grandma taught me to apply lipstick with a brush, as it allows for more precision and even distribution of the product. Start from the center of your lips and work your way outwards, ensuring that the color is even.
Using a brush also helps to apply a thinner layer, which is less likely to smudge and transfer. This method might take a few extra seconds compared to applying directly from the tube, but it makes a difference in how well the lipstick bonds to your lips.
6. Step 4: The Tissue-and-Powder Move That Locks Everything In
This step is where the magic happens. After applying your lipstick, take a single-ply tissue and gently press it against your lips. This removes excess oil and product, setting the first layer.
Then, with the tissue still covering your lips, use a makeup brush to lightly dust translucent powder over the tissue. This technique sets the lipstick without altering its color, creating a matte, long-lasting finish. It’s a simple trick but incredibly effective in keeping your lipstick intact all day.
7. Step 5: The Final Swipe That Makes It Look Fresh, Not Dry
The last step in my grandma’s routine is to apply a final light layer of lipstick. This reintroduces color and vibrancy, giving your lips a fresh look that doesn’t appear dry or cakey.
By layering the lipstick in this way, you’re not only ensuring better adherence but also achieving a perfect balance between matte and creamy finishes. This final swipe seals the deal, leaving your lips looking beautifully polished.
8. How This Trick Survives Coffee, Lunch, and a Whole Workday
The combination of proper lip preparation, setting techniques, and the two-step application process makes this trick incredibly resilient. The foundation base and powder set the lipstick so well that it resists fading, even after drinking coffee or eating meals.
You’ll find that you might only need minimal touch-ups, if any, throughout the day. This trick is especially useful for long workdays, ensuring that your lipstick looks as fresh in the evening as it did in the morning.
9. Lipstick Types and Formulas That Work Best With This Hack
While this trick works with most lipsticks, certain formulas tend to perform better. Matte lipsticks, in particular, benefit from this technique due to their natural staying power. However, creamy and satin finishes can also last longer when applied using this method.
It’s best to avoid overly glossy or oily formulas, as they may not adhere as well to the base layer and powder. Instead, opt for high-pigment lipsticks that provide rich color with minimal layers.
10. Quick Fixes If Your Lipstick Still Won’t Stay Put
If you find that your lipstick still isn’t staying put despite following these steps, consider a few quick fixes. First, ensure that your lips are completely dry before applying the foundation base. Any residual moisture can hinder adhesion.
Additionally, you might want to experiment with different translucent powders, as some might work better with your specific lipstick formula. Lastly, make sure you’re applying thin, even layers of lipstick, as too much product can cause slipping and fading.
11. The Old-School Beauty Wisdom Hidden in This Zero-Effort Routine
What makes my grandma’s lipstick trick so special is its reliance on tried-and-true beauty principles: preparation, precision, and setting. These concepts have been used in various beauty routines for decades, and for good reason—they work.
This routine is a reminder that sometimes the simplest solutions are the most effective. By taking just two minutes to apply these steps, you can enjoy beautiful, long-lasting lipstick that enhances your look with minimal effort. It’s a testament to the wisdom of generations past, proving that effective beauty doesn’t have to be complicated.