3.How to Make It (Step-by-Step)
Making your own cleaner takes just a couple of minutes:
- Gather your ingredients: vinegar, distilled water, dish soap.
- Find a clean spray bottle—rinse it well if it’s been used before.
- Pour in 1 cup of vinegar (a funnel helps).
- Add 1 cup of distilled water.
- Drop in 1–2 drops of dish soap (don’t overdo it, or you’ll get too many bubbles).
- Screw the cap on and shake gently.
- Spray on your windows and wipe with a clean microfiber cloth.
That’s it—your cleaner is ready!
4. Why It Works: The Science Behind the Shine
The secret lies in chemistry:
- Vinegar (acetic acid) dissolves mineral spots, grease, and grime.
- Distilled water keeps minerals out of the mix, preventing streaks.
- Dish soap reduces surface tension so the liquid spreads smoothly and lifts dirt.
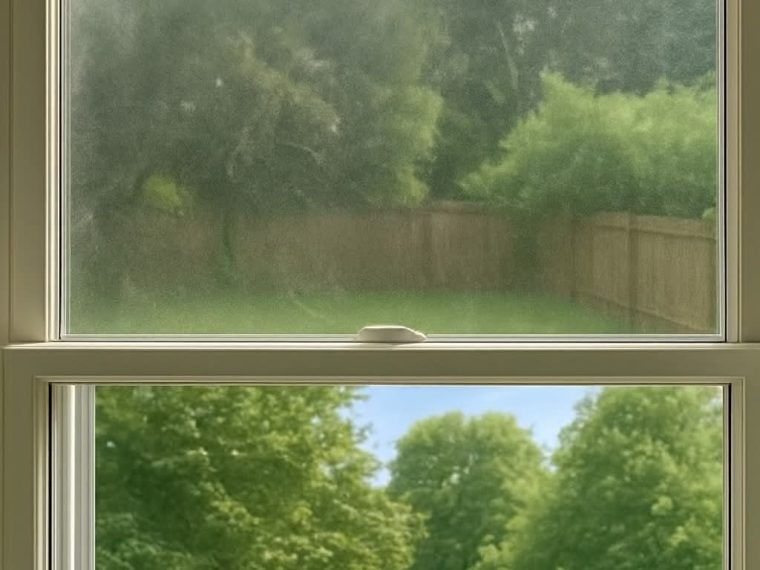
The combination leaves glass surfaces crystal clear.
5. How It Compares to Store-Bought Products
This DIY cleaner has several advantages:
- Healthier for families – no ammonia or harsh fumes.
- Budget-friendly – pennies per bottle compared to several dollars for store brands.
- Equally effective – it delivers that streak-free sparkle without extra polishing.
Many people who try it never go back to commercial options.
6. Better for the Environment
Homemade cleaners help cut down on waste. By reusing a single spray bottle, you avoid sending plastic containers to the landfill. And because the ingredients are biodegradable, you’re not sending strong chemicals into water systems.
It’s a small step that makes a big difference over time.
7. Saving Money the Easy Way
This recipe isn’t just safer—it’s incredibly cheap. Vinegar and dish soap are staples most households already have, and distilled water costs very little. Compared to repeatedly buying branded cleaners, this solution saves families hundreds of dollars over the years.
8. Tips for Streak-Free Results
A few tricks help you get the best finish:
- Use a microfiber cloth or squeegee—not paper towels, which leave lint.
- Clean on a cloudy day—sunlight dries the spray too quickly and can leave marks.
- Work from top to bottom—so cleaner doesn’t drip on already-finished sections.
- Wipe in consistent strokes for a polished finish.
9. Common Mistakes to Avoid
Even with a great cleaner, small mistakes can ruin the results:
- Using too much spray – more isn’t better; a light mist is enough.
- Paper towels – they leave fibers behind.
- Cleaning in direct sunlight – causes quick drying and streaks.
- Ignoring frames and sills – dust from there can spread back onto the glass.
10. What People Are Saying
Plenty of people have tried this recipe and loved it.
- Sarah, a mom of two, was shocked at how simple it was and loved that she didn’t need to worry about chemicals around her kids.
- John, who had tested multiple store brands, said this DIY cleaner was the only one that actually left his windows spotless every time.
The feedback is almost always the same: it’s easy, safe, and surprisingly effective.
11. More Ways to Use It Around the House
This mixture isn’t just for windows:
- Mirrors – streak-free reflection every time.
- Glass tabletops – quick wipe-downs that sparkle.
- Shower doors – keeps soap scum under control.
- Stainless steel appliances – removes fingerprints without scratching.
One bottle can replace several store-bought products, simplifying your cleaning routine.
✅ With just three simple ingredients, you can skip the harsh chemicals, save money, and enjoy sparkling windows year-round.